When I first went plant-based, I remember ordering a pizza without the cheese. I thought it couldn’t possibly be that bad. But it was. It really was.
A good vegan pizza absolutely needs something on it to replace the cheese. There are some awesome vegan mozarella-style cheese alternatives available, but they can be expensive and a bit too processed for my liking.
The herbed cashew cream on this pizza leaves nothing to be desired. It has a cheesy flavour and adds a bit of creaminess that would normally be missing without the cheese.
Why Spelt?
The base is made from wholemeal spelt flour, so it’s not gluten-free (sorry Coeliac friends). However, if you are just a bit gluten-sensitive like I am, you might find that spelt is a lot more gentle on your gut. This is because spelt contains more soluble fibre than wheat. Soluble fibre absorbs water and turns to a gel-like consistency as it digests, making it a lot less harsh on your system.
Spelt is also higher in protein and richer in vitamins and minerals compared with wheat flour.
If you have the luxury of a food processor with a dough blade or benchtop mixer with a dough attachment, awesome. If not, you’re in for about 10 minutes of hand-kneading. But hey, it’s a good arm workout! This recipe is also a lot less complicated than many other pizza bases I’ve tried. You can divide the mixture into either 2 or 3 portions depending on how thick you like it. I prefer thinner pizzas so I divided it into 3.
The Toppings
As with all home made pizza, anything goes, so I’m not going to tell you what you should put on top! Except for the cashew cream – that’s a must. I was in a green kinda mood when I made this one. I used a little red onion, zucchini, broccoli and then I topped with fresh avocado slices after it came out of the oven.
Whatever toppings you choose, par-cook them in a fry pan before adding them to the pizza. It’s only in the oven for 15 minutes, so for pretty much everything except mushroom, that’s not enough cook time. Don’t know about you but I’m all for crunchy vegetables in a stir-fry, just not so much on a pizza :-/
It’s important not to add your cashew cream until the pizza is out of the oven. If you put it on before it will dry out big time. I like to buzz it up just before the pizzas are due out of the oven so it’s still a little warm from the blending process.
When it comes to pizza sauce I like to keep it simple, so a quality (preferrably organic) tomato paste seasoned with a little salt & pepper is just perfect. A clove or two of fresh minced garlic mixed into it doesn’t go astray either. You can sub your favourite pizza base sauce if you wish.
Nothing like healthy, crispy home made vegan pizzas for a midweek dinner!
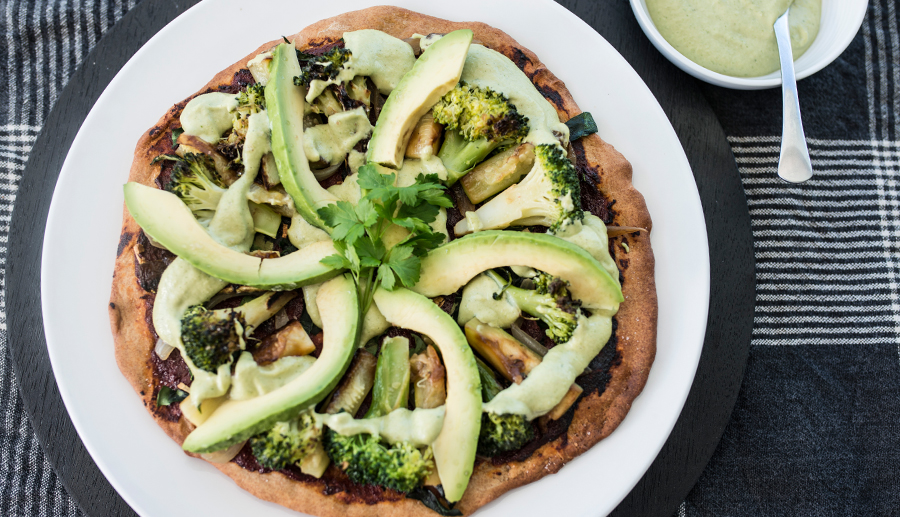

Wheat-free, vegan and perfectly crunchy!
- 3 cups wholemeal spelt flour
- 2 tsp olive oil
- 1/4 tsp fine salt
- 2 tbsp coconut sugar
- 7 grams dry yeast (1 packet)
- 1 cup warm water (no hotter than 45°C)
- 1 cup raw cashews soaked for at least 3 hours
- 1/2 cup coconut cream
- 3 tbsp nutritional yeast
- 1/4 cup fresh mixed herbs roughly chopped
- 1 tbsp apple cider vinegar (fresh lemon juice works too)
- salt & pepper to taste
- 150 mL (approx.) tomato paste for the base
- your favourite veggies & pizza toppings *see note
-
Place the warm water into a small bowl and stir in the coconut sugar. Sprinkle the yeast in top and leave it to bubble and froth. This should take around 10 minutes. If you don't see any froth after 10 minutes, it means your yeast is dead so you'll need to start afresh with a new packet.
-
If using a dough mixer or food processor: Add the flour, salt, olive oil and yeast mixture to the mixing bowl and mix or process according to your machine's instructions for making dough.
-
If kneading by hand: Add the flour and salt to a large mixing bowl and make a well in the centre. Add the yeast mixture and olive oil and work with your hands until it all starts to come together, then turn onto a well-floured surface and knead baby, knead! Do this for about 10 minutes.
-
Place the prepared dough into an oiled mixing bowl and leave for 1 hour with a tea towel placed over the top of the bowl.
-
Split the dough into 2 (for thicker pizzas) or 3 (for thinner pizzas) balls and use a rolling pin to roll them into bases of about 25cm (10inch) diameter.
-
Add any seasonings or garlic to your tomato paste as desired. I recommend a couple pinches each of salt and pepper and a big clove of crushed garlic.
-
Chop any vegetables for your topping and be sure to par-cook them to at least halfway or more if you want to be sure they are nice and cooked through. You can do this in a frypan with lid-on and a little water added so they maintain the moisture which may be lost in the oven, preventing them from drying out too much. Feel free to season with a little salt & pepper while you do this.
-
Once all toppings are prepared, preheat your oven to 230°C (450°F).
-
Spread the sauce over the prepared bases and arrange your toppings. (Don't add cashew cream prior to baking).
-
Bake for 15 minutes or until edges are golden brown and crispy.
-
While the pizzas are baking, make the herbed cashew cream by adding all ingredients to a blender and blend for 1 good minute or so, until very smooth.
-
Remove pizzas from oven and top with as much as you like of the herbed cashew cream! It's a lot healthier than cheese so no need to be shy 😉
*I used spanish onion, broccoli, zucchini (all par-cooked prior to adding to the pizza) and fresh avocado.

Pizza is my favorite thing to cook with the kids. It is one food that their “help” can actually be help. You can’t really screw up putting toppings on, and they love to customize their own little pizzas.
This is a great one for the kiddos and you can make the bases small too 😉 Thanks for the review x
WOW! This came out so delicious! I do the same thing, taking inspiration from a recipe and then changing it up. I had some left over roasted sweet potatoes so I just carmelized onions, browned the turkey in a pan, added some other vegetables, red thai chili paste, and a bit of lemongrass (along with everything you put in the recipe) and it came out amazingly delicious! My fiance was shocked because I put it together rather quickly and it was so yummy 🙂
“This was great! Really enjoyed it – thanks for sharing. I do agree with another commenter who said it was a bit sweet – I will definitely reduce the sugar next time (I used regular granulated sugar).
Can’t wait for leftovers tomorrow! :)”
Awesome Hannah, thanks! Yeah regular sugar is definitely sweeter than coconut sugar so if you use that again try halving it. xx